Sunday 22 July 2012

THE SLOPPY INDIAN LAMB BURGER

"The journey of a thousand pounds begins with a single burger." - Chris O'Brien
 

My cousins came over this Sunday and we had  lamb burgers for dinner. This was so much fun to make and despite the elaborate ingredient list it's pretty easy to put together. I think it's impossible to survive only on brussel sprouts and broccoli but if you have to eat junk food I tell myself home made is better than store bought. Definitely try these if there are a bunch of boys at home - I found one to be quite filling but my cousins inhaled two each so proportion ingredients appropriately.

This is a really Indian tasting burger in flavour (thus the name). If you're from Delhi tell me if it reminds you of the Wimpy's burger?

What you’ll need for about 10 burgers:
For the burger -
1 kg lamb (mince)
½ cup toasted cashews
1 diced bell pepper
2 diced onions
2 tsp cumin powder
1 ½ tsp salt
1 tsp pepper
2 tsp garam masala
2 tbsp ginger garlic paste
1 tsp red chilli powder
2 diced green chillis
Oil for frying
For the sauce -
2 packs tomato puree (400 ml)
2 tbsp garlic paste
2 tsp ginger paste
2 diced green chillis
1 tsp red chilli powder
1 tbsp garam masala
3 tsp oil
Salt
Pepper
For Assembly –
 
Burger buns
Sliced onions
Cheese slices
How to:
A. Put together the patty –
1. Knead together the lamb mince, cumin powder, garam masala, salt, pepper, chilli powder, ginger garlic paste. Put aside.
2. Dice the onions and green pepper. Chop the green chillis fine. Add to the lamb mince and knead it in so it’s well mixed.
3. Take a pan and dry roast the cashews. Just move them around in the pan till they brown a little. Chop after the cashews cool a little and add to the lamb mince. Knead in.
4. Pat the mince into burger patties, remember that when you drop it in the hot oil it will shrink but at the same time if the patty is too large it will crumble. Don’t worry if the patty isn’t the size of the burger buns because you can cut up two or three patties and put them together later.
Note: Try frying a little of lamb first so you can make sure the seasoning is fine.
5. Heat about 2 inches of oil in a large-ish pan or kadhai. Once the oil is hot pop in the lamb cakes one by one. If you’re scared of the patty crumbling try putting the lamb cake on a metal spatula and inserting it in the oil – once it firms up a little you can try flipping it to make sure it’s evenly cooked.  Like I said earlier, don’t worry even if they’re the size of large kebabs, it will still work.
6. Once they’re nicely browned, pull them out and set them on paper towels to soak the extra oil.
B. Make the sauce -
1. Heat oil in a sauce pan and in a couple of minutes add the ginger, garlic, garam masala. Stir.
2. In a minute, add the tomato puree, green chilli, salt, pepper and red chilli powder. Stir.
3. Let the sauce thicken and reduce a little. Taste to see if the flavor is right or if you want to add anything more. I added a little more garlic paste and salt because I felt the sauce was getting too sweet and tomato-y.
C. Assemble the burger –
1. Slice the buns in half and toast till lightly brown.
2. Add a cheese slice and place your lamb patty on it. If you’re finding the patty small then slice another one in half and arrange to fill the bun.
3. Pour a generous quantity of the tomato garlic sauce – it will be messy but otherwise the lamb gets dry so don’t be shy.
4. Top with slices of onion and the other half of the burger bun. Squish down. Serve with home made potato wedges.
Once served expect to see this:


Hungry Brother 1


Hungry Brother 2

Saturday 21 July 2012

CREAMY POTATO BAKE

It's easy to halve the potato when there is love. - Irish Proverb

Oh how I love me my potato!

This is an easy recipe with warm, comforting flavour and will pair well with any meat mains or pasta. I'm looking forward to eating it hot out of the oven in the winter.

What you’ll need:

500 ml milk
500 ml cream
2 small onions (peeled)
4 -5 potatoes
7 – 8 cloves crushed garlic
Salt
Butter

How to:

1.Preheat the oven to 120°C. Peel and chop the potatoes into slices (these don’t need to be very thin so don’t kill yourself).

2. Drop the milk, cream, potatoes, salt, some butter, the onions (peeled but whole) and crushed garlic into a deep pan. Let the mix bubble and cook till the potatoes are tender (not mushy because they’ll cook some more in a bit).

Note: You can use less garlic if you’re not a fan I add lots because I am. =)

3. Pour the mixture (minus the onions) into a baking dish. Add a little more butter and bake for 15 mins or till the top is gently browned and the mixture is bubbling.

 Note: You can pull the dish out and check if the potatoes are properly cooked.

NO COOK OATS

This isn't so much a recipe as an idea. It's a great breakfast idea (I eat it everyday!), you can put it together with whatever you have in the kitchen and is super healthy!

Recipe from my dad
 
What you’ll need:

Instant Oatmeal
Milk or Yoghurt
Fruit Juice (I’ve tried apple and mixed fruit)
Chopped up dried fruits
Chopped up fresh fruit
Honey (optional)

How to:  

1. Pop the oatmeal in a bowl and add enough juice to cover it. Soak overnight.  

2. Stir in as much milk or yoghurt as you’d like and then top with chopped up dried fruits and/or fresh fruits as you like. If you want it sweeter you can add brown sugar or honey.

Eat chilled.

Foodnotes:

You can use any juice but I’m not too sure of more citrus-y fruit because I wonder if it may curdle the milk.

Friday 20 July 2012

CARROT SOUP

I live on good soup, not on fine words. - Moliere


Sometimes we sin but this soup is a little pot of carrot virtue filled with warm, carroty, low calorie goodness. Drink it and watch a little halo form over your head.

When putting this together this kind of soup remember that making it is a very inexact science. Consider this recipe a very broad guideline to work within - add the ingredients and seasonings as you like, just remember to taste often to make sure you get it right.


What you’ll need: 

3 – 5 carrots (chopped roughly)
1 bunch coriander leaves (optional)
2 – 3 tablespoons butter
2 onions (sliced)
6 – 8 cloves garlic (crushed)
2 – 4 bay leaves
Black pepper
Salt

How to:

1. Chop up your coriander leaves finally and keep the leftover stems.

2. In a deep pan, melt the butter, then add bay leaves (wait for a minute), onions (wait for a couple of minutes) and then pop in the crushed garlic. Stir the mixture till the onions start to become translucent.

3. Add carrots, coriander stems and about 5 cups of water and let the mixture bubble.

4. Once the carrots are cooked, throw out the bay leaves floating in the pan and scoop the carrot onion mixture out and blend it in a mixer till it’s a fine puree. In the mean time heat the left over stock in your pan so it reduces slightly.

5. Strain the puree into a container and then add stock till you reach the texture and consistency you want. Pop back on the stove, add salt, pepper and red chilli powder if you like spice.

6. I have my soup plain but if serving to guests, add coriander leaves as a garnish.

 Foodnote:

If you're not very excited by the thought of the coriander, you could replace it with any favourite herb - consider basil, oregano or rosemary?

DULCE DE LECHE CHEESECAKE

 
Dulce de Leche is a sweet, milky, caramel like paste made by slowly heating sweetened milk, popular in South America. You can make it at home by boiling an unopened can of condensed milk in a pot of water for a couple of hours but I would recommend picking up a jar instead of risking exploding cans. This is a recipe for a baked cheesecake and though it is more effort than the World's Easiest Cheesecake recipe I had posted before but when you taste it I think you'll find it was worth it. Make this when you have a little more time on your hands...

What you’ll need:
 
For the crust:

Digestive biscuits/ graham crackers (atleast 1 pack)
4 tablespoons melted butter

For the cheese cake filling:

1 teaspoon unflavoured gelatin powder
¼ cup milk
220 gms cream cheese
3 eggs
1 ½ cup dulce de leche 

How to: 

A. Make the crust –  

1. Preheat the oven to 180°C. Start to heat a large pan of water. 

2. For the crust. Bash the biscuits into crumbs and then mix in the butter till you have a crumbly slightly moist mixture. 

Note: I find the easiest way to crumble biscuits is to pop them in a plastic bag and then pummel them with a rolling pin.  

3. Line your baking tin with your crumb mixture and bake for ten minutes till golden. Take out the crust and let it cool.

 B. Make the filling –

 While the crust cools, put together the filling.

1. Sprinkle the gelatin over the small bowl  of milk and let it sit.

2. Blend the cream cheese till it’s softer. Add the eggs in one at a time and keep whisking. Add the milk mixture and the dulce de leche and whisk till smooth.

3. Pour the filling into the crust. Now place the dish with the cheesecake into a larger baking dish. Pour the boiling water into the larger dish making a water bath for the cheesecake.

4. Very very carefully (I got my brother to do this) place both dishes into the oven and bake for about 40 minutes or till the centre is firm. Remove and cool for at least a couple of hours.

Foodnotes:

If you’re not tired yet, you can put a glaze on top of this – blend a fruit jam with some (compatible tasting) fruit juice and heat OR melt some chocolate with milk and butter to make a quick ganache and pour over the cheesecake.

Sunday 15 July 2012

PINEAPPLE UPSIDE DOWN CAKE

 
Such a pretty, pretty, retro-looking cake! It's really easy to make, needs hardly any ingredients and so much fun to display (without needing to fiddle with a hundred piping bags and odd nozzles). Comforting, honest, and good looking (if you can't find it in the opposite sex why not have it in a cake?).
 
What you’ll need:

Can of pineapple slices
Bunch of cherries
1 cup butter (softened)
1 cup powdered sugar
1 cup flour
3 eggs
1 teaspoon baking powder
1 teaspoon baking soda

How to:

1. Grease your baking dish (i.e., brush down with vegetable oil) and then sieve some sugar over the base. Arrange your pineapple slices to try to cover as much of the base as you can. Drop a cherry in each pineapple hole. I tend to stick them in all the empty spaces I can find. Preheat oven to 200°celsius.

Note: I love pineapple so I cut little chunks and fit then into the gaps between the full pineapple circles.

2. In a large bowl put in your softened butter and sugar and whisk till smooth. Then add the eggs one at a time and keep whisking.

3. In a separate bowl mix together the flour, baking powder and baking soda. Add this to the egg mixture in 2 or 3 batches. Whisk till you have a nice smooth batter.

4. Pour batter on top of your pineapple and cherry arrangement and drop in to oven for about 30 minutes. Once you’re sure the cake is done, extract from oven and let cool for about an hour.

5. While with other cakes moulding or un-moulding them out of the baking dish is a matter determined by your preference, energy levels and whether its burnt and pasted to the bottom the whole point of this cake is to turn it upside down (unless you’ve burnt it and it’s pasted to the bottom – nothing to be done in that case).

So gird your loins young chef and insert a spatula into the sides of your baking dish to try to dislodge your cake. Gently push down on the sides to see how much it will give and whether it’s stuck or not. Best to use a clear baking dish so you can examine the bottom and see if it’s sticking any place. Once you’re sure it’ll give, tilt the cake dish, deftly flip cake into your palm and then slide on to your serving dish.

I’m not sure there’s any way to really explain how to do this – once your cake is tipping out and you think you're going to have a heart attack, you’ll figure it out. Just make sure your cake is cool so it doesn’t break when you start to tilt the dish out.

Thursday 12 July 2012

DIMPLED APPLE CAKE

“Did perpetual happiness in the Garden of Eden maybe get so boring that eating the apple was justified?” - Chuck Palanuik


This recipe works so well and I'm a big fan of apples in any baked dish. It's not a very difficult recipe but the cake takes it time to get done and there are a couple of unfamiliar twists to the recipe so bake this cake when time isn't an issue.

What you’ll need:

For the cake:

1 ½ cup yogurt

Note: Pour the yogurt into a muslin cloth and strain it for a little bit so it’s really thick. The thicker it is the less time you’ll need to spend baking this cake.

3 ½ cups apples (chopped)

Note: Peel and core your apples - chop into ½ inch chunks.

1/3 cup vegetable oil
¼ cup lemon juice
1 cup sugar
5 eggs
1 tablespoon vanilla
2 ½ cups flour
2 ½ teaspoons baking powder
1 teaspoon baking soda
½  teaspoon salt
Pinch freshly ground nutmeg
1 tablespoon powdered cinnamon

For the cinnamon streusel:

1 tablepoon cinnamon
½ cup brown sugar
2 tablespoons unsalted butter, softened

How to:

1. Preheat your oven to 175° Celsius and grease your baking dish well.

2. In a large bowl, mix together the thickened yoghurt, vegetable oil, lemon juice, sugar and vanilla. When smooth beat in the eggs one by one till your batter is smooth again.

3. Stir the flour, baking powder, baking soda, nutmeg and cinnamon in together. Add the dry ingredients to the batter in 2 or 3 batches and whisk till smooth.

4. In a separate bowl mix together 2 tablespoons cinnamon, butter and brown sugar, if you want it smoother you can add some more butter but it’s fine to leave it lumpy.

5. Pour half the batter into your baking dish and drop lumps of your cinnamon mixture into the batter. Pour the remaining batter and then drip the remaining cinnamon mix to dimple your cake.

6. Bake for about 30 minutes – this could take longer so don’t stress. Keep checking and take the cake out when a toothpick inserted into the cake comes out clean.

Foodnotes:

  • If you don’t want your cake to brown too much consider covering it with foil about 20 minutes into the oven.  
  • This is a heavy moist cake so let it cool for at least 2 – 3 hours before trying to un-mould it.


Tuesday 10 July 2012

GINGER GARLIC YOGURT

"I always cook with wine. Sometimes I even add it to the food." - W.C. Fields


Sometimes you eat something that stays in your head for the longest time, this garlic raita is one of those things for me. I spent years thinking about this creamy, softly brown, gorgeously garlic-y raita I had once in restaurant in Hyderabad and this embarrassingly simple recipe is the result. It pairs perfectly with a heavy Indian meal but you can have it any old time.
 
What you’ll need:

300 ml yogurt
4-5 tablespoons of ginger garlic paste
Salt to taste

 How to:

If you’re using store bought ginger garlic paste all you need to do is to mix the paste and yogurt together and blend using either a whisk or in the mixer so it’s super smooth. Add salt only if you think you need it since these pre-prepared pastes often have salt in them already.

If you’re make the ginger garlic paste by hand then see if you can run it through the mixer once before you add it to the yogurt so there aren’t any chunks. In this case you’ll have to add salt. Run through mixer again till creamy.

Sprinkle some red chilli powder on top for colour and serve chilled.

Foodnote:

Most people may not blend their raitas in a mixer but the reason I insist here is because it is best when it is super creamy and smooth - if the yogurt you're using is very watery, you may want to drain some of that out so you get a nice substantial paste.

Modify the quantity of ginger garlic you’re using based on your tolerance for the taste of it – I can add heaps for myself but more delicate palates may just want a subtle hint of ginger garlic.

Sunday 8 July 2012

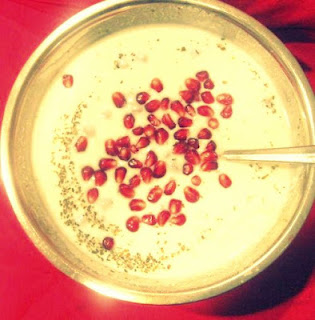
GINGER, HONEY, POMEGRANATE YOGURT

"Vegetarian: an old Indian word for bad hunter" - Unknown


Yogurt is SO good for you that everyone should absolutely be eating it with every meal! In fact this has inspired me to put together a little post going on about the joys of yogurt consumption. While I get that together, try this.

What you’ll need:

1 pomegranate
300 ml yogurt
1 teaspoon ginger
6 teaspoons honey

How to:

Scoop out pomegranate seeds. With a blender mix together the yogurt, ginger and honey till smooth. Add pomegranate seeds and mix. When serving top with some pomegranate seeds and drizzle with honey.

Foodnote: 

The quantities prescribed here are only recommendations, try it with the proportions I've given you here and then add whatever you want in the quantity that makes it most yummy for you!


Saturday 7 July 2012

MARMALADE CAKE

“I suppose I want to have my cake and eat it. But then again, what were you going to do with your cake if not eat it? Frame it? Use it as a sachet in your underwear drawer?”  - Marian Keyes

If you're afraid of calories this is not the cake for you. It's adapted from one of Nigella's recipes and while she is many wonderful things, calorie conscious is not one of them. I really struggled with my conscience when pouring in the whole cup of butter she requires but once this cake comes out it is just so soft and so warmly fruity flavoured that you might not even notice your arteries hardening. I wouldn't recommend you bake this often but every once in a while you deserve a treat and it is GORGEOUS when it's done.

Serves 6
Adapted from Nigella Lawson
 
What you’ll need:

 1 cup unsalted butter (softened)
¾ cup sugar
¾ cup marmalade (pick your flavor!)
1 cup flour
1 teaspoon baking soda
1 ½ teaspoon baking powder
5 eggs
1 cup orange or lime juice
24 cm baking dish 

How to:

1. Preheat your oven to 180°celsius and grease an oven proof dish. Put aside ½ a cup of orange juice and 2 to 3 tablespoons of marmalade aside in a small saucepan. 

2. Take a large bowl and dump in the butter and sugar. Whisk till smooth. Add one egg at a time and whisk till smooth each time. Add the marmalade and the remaining juice. 

3. Stir together the flour, baking soda and baking powder. Add to the egg mixture in halves and whisk till smooth.  

4. Pour batter into your baking dish and bake for about 25 - 30minutes. Once a tester inserted into the cake comes out clean pull the cake out and let cool for about an hour or so. Once cool, un-mould the cake.

5. Warm the marmalade and juice and mix till it’s a thick paste. Apply with a brush on to the cooling cake, let cool. Apply as many layers as you can – if you lose patience towards the end then just pour the remaining glaze on to the cake and let cool.

Friday 6 July 2012

CUCUMBER MELON COOLER

"Is your cucumber bitter? Throw it away." - Marcus Aurelius


It's 45 degrees out and I've taken to spending my days under the shower. Combat the dangers of dehydration, heat stroke and all around irritability with this cucumber melon cooler. It may not bring back the spring in your currently sweaty step but it should give you just about enough energy to book your tickets out of Delhi.
 
What you’ll need:

2 cups chopped cucumber
1 ½ cup chopped melon
Honey to taste
Crushed ice to serve

How to:

Note: Before you start blending your cucumber don’t forget to taste to see if its turned bitter!

Blend the cucumber and melon in a mixer and add a tablespoon or two of honey if you want it to be sweeter.

Serve with crushed ice.

Foodnotes:

I used musk melon but you could use pretty much any kind of melon. You could sieve the mixture and get at a thinner juice but its best (and most nutritious) if you drink it in this thick, soothing, filling form.


Tuesday 3 July 2012

THAI CHICKEN

"Ask not what you can do for your country. Ask what's for lunch" - Orson Welles


This is a little bit of a variation on the usual Thai red curry. I'm usually perfectly happy to follow the instructions on the back of the box of red curry paste but I've done the Thai green and red box curries so many times it was fun to do it a little bit differently this time.

What you’ll need:

1 ½ tetra packs of coconut milk (300 ml)
½ kg chicken (boneless)
¼ cup paste made of peanuts and oil ground together
1/3 cup chicken broth
2 tablespoons soy sauce
2 tablespoons vinegar
1 tablespoon brown sugar
2 tablespoons red curry paste
1 tablespoon ginger (grated)
3 cloves garlic (minced)
½ cup flour
Chilli powder
Salt
Pepper
Vegetable oil

How to:

1. Mix together the coconut milk, peanut paste, broth, soy sauce, vinegar, brown sugar, curry paste, ginger, garlic and red chilli powder. Pour into sauce pan and bring to a boil, then simmer for about 15 minutes. Keep stirring.

Note: Easiest way to make sure any cooking turns out right is always to keep tasting. Check your coconut milk mixture and make sure you like how it's turning out. If not, feel free to add more of anything you think you need.

2. Preheat oven to 180° Celsius.

3. Drop the flour and some salt and pepper into a bowl, whisk to mix. Pop your chicken pieces into this flour mix and coat evenly.

4. In a skillet, cook your chicken in hot oil till brown (keep turning so you don’t burn one side!). When nice and brown transfer to your baking dish. Pour your coconut milk mixture on top and plunk into an oven for about 30 minutes.

5. Sprinkle with cilantro or finely chopped up carrots and cucumber. Serve with hot cooked rice.

Note: There’s a really fun Indonesian rice recipe that would be perfect to serve with this - recipe coming up soon.

Monday 2 July 2012

COLD CUCUMBER SOUP

"and the sea cucumber turns to the mollusk and says "with fronds like these, who needs anemones?"" - Finding Nemo


I can't say I'm the biggest fan of cold soups, they remind me too much of bland vegetable juice and dragon detox diets. But circumstances (primarily that this is to be the hottest summer in the last 33 years) are making it really difficulte to palate anything that isn't straight out of the freezer. This cucumber soup is perfect summer food - cool, refreshing and easy to put together.

What you’ll need:

 2 cups cucumber (chopped)
3 cups buttermilk (about one and a half cups yoghurt and water)
1 ½ tablespoons ginger (chopped)
1-2 green chillies (chopped)
Fistful of mint leaves
2 tablespoons lemon juice
Pepper
Salt

How to:

In a mixer, blend together the cucumber, chillies, lemon juice, mint, salt, pepper and ginger. Add buttermilk and blend again.

 Note: You will have tiny chunks of mint and ginger in your soup I quite like biting into a little texture but if you want it smooth pour the soup through a sieve.

Garnish with mint leaves and serve.  

FRENCH CASSEROLE

People who love food are the best people - Julia Child
 
This was a little hard for me because I was cooking blind - I have no idea what this is actually supposed to taste like. The recipe I worked off wasn't particularly helpful, the picture looked nothing like what I finally ended up with, the quantities of the ingredients were off and basically there were lots of bits in the middle where I was just guessing and hoping for the best. Is this French? You know, I doubt it. The oregano and basil make it taste more Italian to me. The point is that it tastes really good and it is worth it in the end.

What you need:
3 cups steamed rice
3 cups spinach (chopped)
½ cup cheese (grated)
3-4 onions (chopped)
4-5 tablespoons butter
2-4 tablespoons milk
3-5 tablespoons cream
1 green chilli (optional)
2- tablespoons oregano and basil (dry)
4-5 tomatoes (chopped)
Salt to taste
Leftover chicken/ vegetables (if any)
 
How to:
 
Note: This casserole is actually in 3 layers so this recipe will tell you how to put together each layer - then you just pile one on top of the other and bake.
 
A. Buttered Rice:
 
Take your steamed rice and fork in a couple of tablespoons of butter. Add 2 tablespoons milk and a teensy bit of salt and stir in. Personally, I’d say you can skip the salt since the butter will add salt and the layers on top trickle down and flavor the rice anyway.
 
Note: If you have leftover chicken or vegetables I should think chopping them up and adding them to the rice will make the casserole more interesting.
 
B. Spinach:
 
1. Take half your chopped onions and plop on to a pan with some butter heating in it. Let them turn translucent and then add your spinach.
 
2. Cook the spinach for just a couple of minutes – don’t worry they’ll bake more later. Add salt to taste. Drain if there’s any spinach juice in the pan and set aside.
 
Note: Ideally each layer should be solid-ish so that it doesn’t all melt into each other when baking – it’s nice to have 3 distinct layers of flavor to bite into.
C. Tomato Sauce
 
1. Cook the tomatoes and the rest of your onions in water till soft. Drain the water out and dunk into a mixer. Mix to a paste.
 
2. Add oregano, basil. salt, cream and mix. Throw into a pot and cook for a few minutes. Cook this on an open pan so it has a thick sauce like consistency.  
 
Note: I added some tomato puree at this stage because the wimpy orange tomatoes I had weren’t giving the sauce the nice red colour I wanted.
 
D. Bake                      
 
1. Layer your rice on the bottom and spread evenly with a spatula.
 
2. The spinach comes second – spread evenly. Top with the tomato sauce. Pile your grated cheese on all this and thrown into an oven at 230 degrees for about 15- 20 minutes.
 
3. Pull out and let cool for a bit and serve.